Product Details
The Liberty Pet Door for Black Sash Windows is a removable panel for double-hung sash windows with a black frame. The bottom sash slides up, the panel drops into the opening, and the sash closes back down onto the panel. No cutting, no drilling.
Heavy aluminum frame in black, with three flap sizes (small, medium, large). Stock widths run from 21.5" to 44" in 1.5" bands, with a custom-width option for non-standard sashes. A locking cover is included. The frame includes safety glass above the flap area so the closed window still reads as a window.
Before ordering, measure the inside width of your window sash, left edge to right edge. Pick a width range that brackets your measurement. If your window is white, use the white sash version. For cat-only homes, the cat-sized sash panel is smaller and costs less.
Made in the USA and backed by a 3-year warranty. Easy DIY install, no tools required.
 Size Chart
Find The Best Pet Door Size For My Pet
- /products/black-sash?variant=44901026660581
- /products/black-sash?variant=44901026693349
- /products/black-sash?variant=44901026726117
- /products/black-sash?variant=44901026758885
- /products/black-sash?variant=44901026791653
- /products/black-sash?variant=44901026824421
- /products/black-sash?variant=44901026857189
- /products/black-sash?variant=44901026889957
- /products/black-sash?variant=44901026955493
- /products/black-sash?variant=44901026988261
- /products/black-sash?variant=44901027021029
- /products/black-sash?variant=44901027053797
- /products/black-sash?variant=44901027086565
- /products/black-sash?variant=44901027119333
- /products/black-sash?variant=44901027152101
- /products/black-sash?variant=44901027184869
- /products/black-sash?variant=44901027217637
- /products/black-sash?variant=44901027250405
- /products/black-sash?variant=44901027283173
- /products/black-sash?variant=44901027315941
- /products/black-sash?variant=44901027348709
- /products/black-sash?variant=44901027381477
- /products/black-sash?variant=44901027414245
- /products/black-sash?variant=44901027447013
- /products/black-sash?variant=44901027479781
- /products/black-sash?variant=44901027545317
- /products/black-sash?variant=44901027578085
- /products/black-sash?variant=44901027643621
- /products/black-sash?variant=44901027676389
- /products/black-sash?variant=44901027709157
- /products/black-sash?variant=44901027741925
- /products/black-sash?variant=44901027774693
- /products/black-sash?variant=44901027807461
- /products/black-sash?variant=44901027840229
- /products/black-sash?variant=44901027905765
- /products/black-sash?variant=44901027938533
- /products/black-sash?variant=44901027971301
- /products/black-sash?variant=44901028004069
- /products/black-sash?variant=44901028036837
- /products/black-sash?variant=44901028069605
- /products/black-sash?variant=44901028102373
- /products/black-sash?variant=44901028135141
- /products/black-sash?variant=44901028200677
- /products/black-sash?variant=44901028233445
- /products/black-sash?variant=44901028266213
- /products/black-sash?variant=44901028298981
- /products/black-sash?variant=44901028331749
 Installation Instructions
 Difficulty
Easy
Difficulty
Easy
 Steps
04
Steps
04
 Time Required
0.5 hours
Time Required
0.5 hours
 Sections
01
Sections
01
 Flags
01
Flags
01
Step 1
Release Spring Mechanism
- Loosen the width adjustment locks at the end of the pet door insert with the screwdriver. This allows the spring mechanism to move freely from side to side.
Step 2
Check Panel Fit
- Insert the sash into the window track. Push against the spring mechanism and swing the opposite end into the opposite window track. Gently release. Tighten the width adjustment locks.
Step 3
Apply Weatherstripping
- Once you're sure the panel fits, remove it from the frame and lay it on its side on the ground.
- For foam weatherstripping: Peel the backing off the foam weatherstripping. Press it along both edges of the panel, trimming as needed with scissors to ensure a snug fit.
- For rubber weatherstripping: Clean the edge of your sliding door or window with rubbing alcohol to help the weatherstripping stick properly. Starting at the top or bottom, peel and press the strip into place with the folded edge facing indoors—align angled cuts if you have two pieces. For best results, apply the seal to the sliding door or window, but it can go on the pet door panel if needed.
- Foam weatherstripping is applied onto both sides of the panel, but the rubber weather stripping only applies on the side of the slider door. Your panel will come with one type of weather stripping. You do not need both types.
Step 4
Mount Seal Draft Stopper
- Mount the Center Post Weather Seal Draft Stopper. This strip prevents air from leaking between the window frame when raised to accommodate the sash. Trim to fit with scissors.
- Put the panel back into the window track. Tighten width adjustment locks.
Switch the Side of the Flap
You can switch which side of the sash panel the pet door flap is on to best fit your home.
Step 1
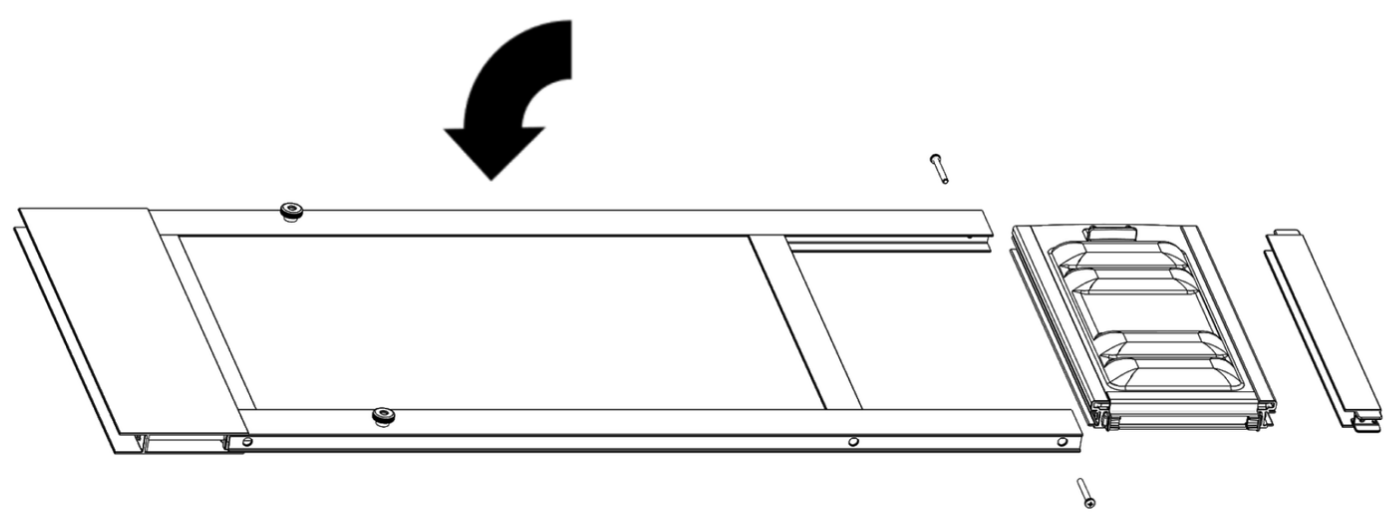
- Remove the screws on the top and bottom closest to the edge of the pet door. Then slightly loosen the screws closest to the glass. Next, slide off the side piece, then the flap assembly.

Step 2
- Rotate the flap assembly (essentially flipping it upside down) then slide it back in. Make sure the locking cover is on the same side as the width adjustment locks.
Step 3
- Replace the end spacer and screws.
LOCKING YOUR WINDOW
For a permanent lock, install a wood screw in the track immediately above the window on both sides. You will no longer be able to raise the window. For a temporary lock, place a removable wooden dowel or Charley bar in either track above the window, shown in Detail 1.

HEIGHT OF YOUR WINDOW
Make sure you place steps or ramps leading to your pet’s door at a height that works! When they go through the flap, the top of the flap should be at least 1" (2,5 cm) higher than the top of their back. Watch your pet and adjust as needed to keep them comfortable.
 FAQ
FAQ
|
|
What do I do if my window opens left-to-right?
For windows that opening left to right, check out the < a href="/products/black-window">Liberty Pet Door for Black Horizontal Sliding Windows.
|
 Warranty
Warranty
Warranty Type: Limited.
Duration: 3 years
Coverage: Defects in materials and workmanship under standard regular use.
Exclusions:
 Customer Reviews


 Product Details


